Een document bevat content, dat moge duidelijk zijn. Bijna alle printers drukken zonder klagen een leeg vel papier af, maar met content ziet het er veel beter uit, toch? In het vorige hoofdstuk hebt u geleerd hoe u content importeert in uw document. Nu is het tijd om vertrouwd te raken met het bewerken van de content. Dit bespreken we aan de hand van de verschillende aanmaakgereedschappen.

Als u tekstuele content wilt bewerken, moet u het tekstframe
openen. Klik hiervoor dubbel op het betreffende frame. U ziet dan een
grijze tekstlineaal boven het frame, zoals u zich nog zult herinneren.
Met uw dubbele klik hebt u tevens het huidige gereedschap gewijzigd in
het Tekstgereedschap
– en u zult de tekstcursor zien
knipperen in het tekstframe. Gebruik de muis om indien nodig de
tekstinvoercursor te verplaatsen naar een andere plaats. Vanaf hier
kunt u uw tekst typen, verwijderen, of corrigeren.
U kunt speciale tekens net zoals in andere programma's invoegen
via het palet Speciale tekens
uit het systeem. U vindt deze
onderin het menu Wijzig
.
Met een [Control]-klik opent u het contextuele menu
Tekstwijziging modus
.
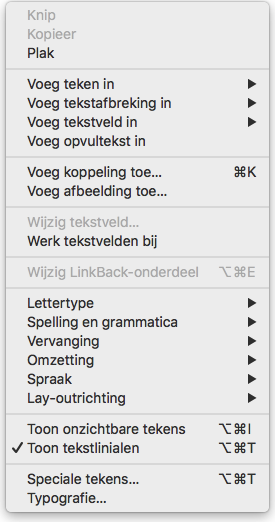
Hier vindt u nog veel meer functies voor het wijzigen van tekst, invoegen van speciale tekens (zogenaamde tekstvelden) en zelfs voor invoegen van afbeeldingen in de tekst. Stop hier even om al deze functies even rustig uit te proberen. Ze worden allemaal in detail beschreven in de referentiehandleidinghoofdstukken.
Voor het verder bewerken van tekstinhoud en tekststijl zijn er bepaalde infovensters bij de hand die we hier graag willen toelichten. Sommige van de functies zijn zo krachtig dat het te ver zou gaan om er hier gedetailleerder op in te gaan. Maar zoals u al weet is de referentie ...
Met het Inhoud-infovenster
kun u definiëren of het
tekstframe meerdere kolommen moet ondersteunen. U kunt hier ook
afbreking en de taal voor afbreking instellen.
In het Kleur-infovenster
kunt u verschillende kleuren
instellen voor de lettertypen, voor contouren en voor schaduwen.
Het gedrag voor de schaduw kan worden ingesteld in het
Frame-infovenster
. Hier vindt u zelfs de meest obscure opties
voor spelen met schaduwen. Probeert u het eens uit.
De belangrijkste infovensters voor tekst zijn het
Tekst-infovenster
, het Tekststijl-infovenster
en het
Tekstliniaal-infovenster
. Zoals gezegd voert het opsommen van
alle functies op deze plaats te ver...

Verbeelding!
– Makkelijk gezegd, makkelijk gedaan. U
kunt momenteel geen beelden schilderen of tekenen in iCalamus. Dat
moet nog worden ontwikkeld. Maar u weet al wel hoe u een afbeelding
importeert in uw document. U hebt zich mogelijk afgevraagd waarom de
afbeelding er in het frame iets anders uitziet dan u verwacht.
Misschien hebt u alleen nog maar een 4x4 cm sectie gezien van het
midden van de werkelijke afbeelding en zich afgevraagd waar de rest is
gebleven.
Beginnen bij het begin: iCalamus maakt onderscheid tussen het frame van de afbeelding en de afbeelding zelf, als twee totaal verschillende dingen. De afbeelding kan worden weergegeven in zijn oorspronkelijke grootte, terwijl het frame veel groter of kleiner is. (In uw eerste pogingen was het laatste waarschijnlijk waar.)
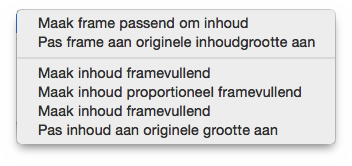
Met een [Control]-klik opent u het contextuele menu
Afbeeldingframes
. Pas aan
is hier de belangrijkste
menuoptie, omdat deze functies heeft die u nodig hebt om de afbeelding
aan te passen aan de framegrootte, de framegrootte aan te passen aan
de afbeelding of beide.
Pas aanvan het
Menu Objecten.
Maar wat als u liever een deel wilt zien dan de hele afbeelding in
het frame? Die keuze is aan u. U kunt ook het frame openen (zoals u
weet moet u daarvoor het Selectiegereedschap
selecteren en op
het kleine driehoekje klikken in de linkerbovenhoek van het frame tot
deze naar beneden wijst – of klik dubbel in het afbeeldingframe)
en de afbeelding verplaatsen met de muis, tot alleen het gewenste deel
wordt weergegeven in het frame. Hierna sluit u het frame en u bent
klaar.
U kunt ook het frame verplaatsen terwijl de afbeelding zelf op
zijn oorspronkelijke plaats blijft. Hiervoor pakt u het frame met de
muiscursor en verplaatst u deze. Wat? Wordt op uw scherm ook de
afbeelding zelf verplaatst? O jee, het spijt me. Ik ben een
belangrijke optie vergeten te melden. In het
Geometrie-infovenster
vindt u (net zoals in de meeste andere
infovensters) een klein knopje dat eruit ziet als een rader. (Zo'n
knopje wordt een Actiemenu
-knop genoemd in Apple jargon.) Als u
klikt op deze knop, ziet u een selectiemenu. In dit geval is dat het
Actiemenu met geavanceerdere Geometrie-infovenster
acties. U
bent waarschijnlijk al bekend met de alle weergegeven functies,
behalve één.
De eerste schakelaar is erg handig als u een frame wilt wijzigen,
maar niet zijn inhoud. U zou, aangezien de frameinhoud verplaatst is
met het frame op uw computer, moeten zien dat het menuonderdeel
Transformeer inhoud
nog actief is. Met een klik op het
menuonderdeel schakelt u deze weer uit (het vinkje verdwijnt). Wanneer
u het frame nu verplaatst, blijft de inhoud waar deze is.
En het beste is: dit werkt niet alleen met afbeeldingframes, maar voor alle framecontent (behalve tekst). Zoals eerder vermeld, maakt iCalamus niet echt verschil tussen afbeeldingframes, tekstframes, etc.
U weet nu al hoe u afbeeldingen bewerkt tot de juiste grootte in
een frame en hoe u het juiste deel van de afbeelding kiest. In het
Geometrie-infovenster
vindt u veel meer mogelijkheden voor
buigen en draaien
van het frame of zijn inhoud. Probeer eens om
de afbeelding naar links te draaien en dan naar het frame zelf naar
rechts, gevolgd door beiden 20 graden naar links te duwen en spiegel
vervolgens horizontaal. (Vraag me niet waarom...)
In het Inhoud-infovenster
wijzigt u de weergave van
afbeeldingen. U kunt hier de opaciteit traploos verlagen van 100% naar
0%. U kunt hier ook het afbeeldingframe mixen met andere framecontent
die mogelijk onder het afbeeldingframe ligt. Het is interessant om
eens te spelen met de mixmodussen in iCalamus. Probeer het eens uit.
In het actiemenu van het Inhoud-infovenster
vindt u de
functie Maak opaciteitgebaseerde contour
. Gebruik deze voor het
toevoegen van een masker op uw afbeelding dat gebruikt kan worden als
afkappad met een enkele klik. Deze functie is afhankelijk van het
afbeeldingtype.
De andere infovensters bieden nog meer mogelijkheden om het
afbeeldingframe aan te passen. Het Frame-infovenster
kan nog
een vorm toevoegen, nog een contour of een schaduw aan het frame. Als
u een bepaalde vorm als contour hebt gekozen, dan kunt u deze direct
als afkappad gebruiken om de foto van uw geliefde oma te laten
schitteren in een mooie ovaal, of om het nieuwe superproduct van uw
bedrijf goed te laten uitkomen in een ster met 50 stralen. Als u een
schaduw of contour heb toegekend aan het afbeeldingframe in het
Frame-infovenster
dan kunt u de kleuren definiëren in het
Kleur-infovenster
.
[Deze sectie is nog niet vertaald.]
![]()
In iCalamus, you can easily create empty frame containers for several purposes.
Publishers use them as substitutes for layout areas which have not been created or designed. If you have switched frame guides visible, these container frames show the frame shape as a guide, together with a diagonal cross to indicate that they are empty. (We also use a diagonal cross to indicate transparent mode in color lists.)
If you want to shape or mask an image with a shape, iCalamus offers several ways to do so. The easiest and fastest way is to create one of the available container shape frames, place the image there, and you've made the masked image.
You can convert containers to normal frames afterwards by assigning new content to them.
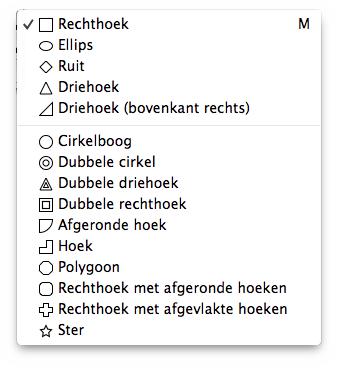
Here is a list of the available container shapes. These are identical to the available normal shapes.
![]()
Choose the desired container type in the Container tool
by
right clicking on the Container tool
symbol in the Toolbox
panel. Alternatively, keep the mouse button pressed until the
container tools menu appears, from which you can choose the container
type. Now create a new frame in the document by dragging the mouse. If
you press [Escape] before you release the mouse button, the currently
shown container will be deleted immediately.
The 'simple' container shapes are listed in the first group. The
'dynamic' container shapes are listed in the last group, sorted by
complexity. You can change the parameters of the dynamic containers by
using the Edit Shape Parameters
additional function in the
"Frame-infovenster".
[Deze sectie is nog niet vertaald.]

Use this tool to create shape frames. iCalamus offers a variety of pre-defined shapes, from simple rectangles to stars and corners.
Choose the desired shape type in the Shape tool
by right
clicking on the Shape tool
symbol in the Toolbox panel.
Alternatively, keep the mouse button pressed until the shape tools
menu appears, from which you can choose the shape type. Now create a
new frame in the document by dragging the mouse. If you press [Escape]
before you release the mouse button, the currently shown shape will be
deleted immediately.
As we assume that you will use the Shape tool
often, we
have placed it in the right column of the Toolbox panel in order to
reduce mouse distances.
The 'simple' shapes can be found in the first group of the list.
The 'dynamic' shapes follow in the last group, sorted by complexity.
You can change the parameters of the dynamic shapes by using the
Edit Shape Parameters
additional function in the
"Frame-infovenster".
[Deze sectie is nog niet vertaald.]

Use this tool to create a line frame. iCalamus offers three line tools and a variety of pre-defined line types, like simple lines, multiple lines, arc lines and crosses.
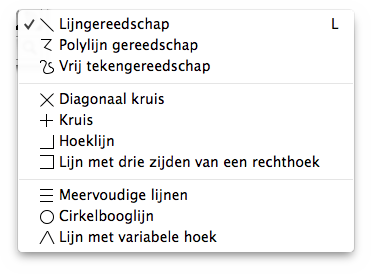
Choose the desired line type in the Line tool
by right
clicking on the Line tool
symbol in the Toolbox panel.
Alternatively, keep the mouse button pressed until the Line tools menu
appears from which you can choose the line type. Now create a new
frame in the document by dragging the mouse. If you press [Escape]
before you release the mouse button, the line that you are drawing
will be deleted immediately.
Use this tool if you want to draw simple lines very fast. When you release the mouse button, a line frame is created which can be edited like all other frames.
Using this tool, you can draw multiple straight lines at once. Click to positions which should be connected by lines. If you press the mouse button while dragging to the next point, the result will not be made of straight lines but of curves. A double click ends the current polyline.
Draw absolutely freehand lines with this tool. Just draw the line you want with the mouse cursor. As soon as you release the mouse button, your drawn path will be vectorized and rounded.
The line types in the next group are pre-defined lines which
can be drawn by choosing the relevant line type and creating a frame.
See the New Line Object
section of the Frame inspector
for additional information about these line types: Diagonaal
kruis
, Kruis
, Hoeklijn
, Lijn met drie zijden van
een rechthoek
.
The last group of line types in the list offers dynamic line
types. See the New Line Object
section of the
Frame inspector
for additional information about these line
types: Meervoudige lijnen
, Cirkelbooglijn
, Lijn met
variabele hoek
.
After you have created the relevant line frame, you can change its
parameters with the menu item Edit Shape Parameters
in the
Frame-infovenster
. (The editing dialog for each of these line
objects is included above with the information about each object.)
Such things as the number of Multiple lines (How about Music Score
lines?) or the angle of an Arc line can be changed there.
[Deze sectie is nog niet vertaald.]

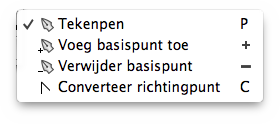
Use this tool for editing existing vector objects and vector paths, for adding and removing vector points, changing vector types, and creating new vector paths.
Use this tool for creating new vector paths. Click somewhere in the document and start the new path there. Then click to the next position. A vector line will be created between the start point and the next point. If you drag the mouse to the position of the next point click, a bezier curve will be created from the last point to the current point instead. If you keep the mouse button pressed, you can directly resize and reformat the curve. Continue until you have placed all of the points. You can pause the path creation and continue at any time. The next point will always be connected to the last point.
If you want to move single points or base points of bezier curve tangents, you have to activate the Selection tool.
If you click into an already existing vector path with this tool, a new base point will be inserted at the clicked position.
If you want to remove a base point from a vector path, choose this tool and simply click on the relevant point which will be removed immediately.
If you click on a curve with this tool, it will be converted
into a vector line. If you click on a line, it will be converted into
a curve which is formed like the previous line by default. You may
then drag the base points from the straight curve
with the
mouse in order to format the curve to your needs.
