[Ten rozdział nie został jeszcze przetłumaczony.]
A document consists of content, that's self-evident. Almost all printers do print an empty sheet of paper without complaining, but it looks much better with content, doesn't it? In the previous chapter you have learned how to import content into a document. Now you should get familiar with how to edit content. We will discuss this using the range of creation tools.

If you want to change text content, you have to open the text frame. A double-click on the frame and you're done. You will see the gray text ruler above the frame then (do you remember?). Furthermore, your double-click switched the current tool to the Text tool – and you will see the text input cursor blinking in the text frame. Use the mouse cursor and place the text input cursor in another position if desired. Then you can type, delete or correct your text.
You can insert special characters like in other programs by using the Special Characters palette offered by the system. You will find it at the very bottom of the Edit menu.
With a [Control]-click, you can open a Text edit mode context menu.
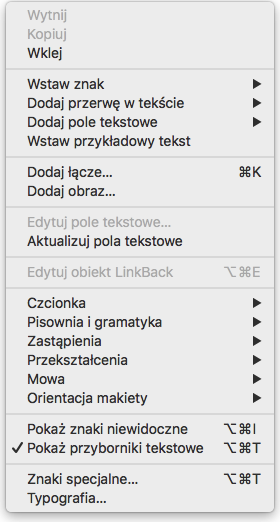
Here you find much more functions for changing text, inserting special characters, so-called text fields and even images into the text. Stop to try out all these functions in a quiet minute. They are all described in detail in the reference manual chapters.
For further editing of text content and text style some inspectors are at hand which we just want to mention here. Some of their functions are so powerful that it would go too far to give a more detailed description here. As you know already, the reference ...
Using the Paleta Zawartość, you can define if the text frame should support multiple text columns. There you can also define the hyphenation and the language used for hyphenation.
In the Paleta Kolor you can set up different colors for the fonts, for outlines and for shadows.
The shadow behaviour can be set in the Frame inspector. There you find the screwiest options for playing with shadows. Just try it.
The most important inspectors for text are the Text inspector, the Text Style inspector and the Text Ruler inspector, of course. We cannot list their variety of functions here, as you know ...

Imagine!
– Easily said, easily done. You cannot paint
and draw images in iCalamus right now. That still has to be developed.
But you know already how to import an image into your document. You
will probably have wondered why the image looked almost different in
the frame to what you have expected. Maybe you have only seen a 4x4 cm
section from the center of the real image and wondered where the heck
the rest of it has gone.
First things first: iCalamus basically differentiates between image frame and image content, both being totally different things. The image content can be shown e.g. in original size, while the image frame is much larger or smaller. (In your first trials, the latter will have been probably true.)
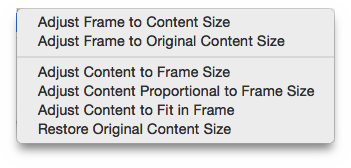
With a [Control]-click, you open the Image frames context menu.
Dopasownie
is the most important menu item there, because it
offers those functions that you need to adjust the image content to
the frame size, the frame size to the image content or both.
Dopasownieof the
Menu Obiekty.
But what if you want to see a section rather than the whole image in the frame? It's your choice. On the one hand, you can open the frame (as you know already, you simply have to select the Select tool and click the tiny triangle in the upper left corner of the frame until it points downwards – or simply double-click into the image frame) and move the image content with the mouse, until only the desired section is shown in the frame. Close the frame afterwards, and you're done.
On the other hand, you can move the frame while the image content
stays on its original position. Therefore you grab the frame with the
mouse pointer and move it. What? On your screen the image content is
moved too? Oh, I'm sorry. I forgot to mention an important switch. In
the Geometry inspector, you find (like in most of the other inspectors
too) a tiny button showing a gear wheel. (These buttons are called
Action menu
button in the Apple jargon.) When you click this
button with the mouse, you will again see a selection menu, in this
case it's the Action menu offering enhanced Geometry inspector
actions. You will already be familiar with the shown functions but
one.
The first switch indeed is very handy if you want to change a
frame but not its content. As the frame content was moved with the
frame on your computer, you should still see the menu item
Przekształcaj zawartość
checked. With a click on the menu
item you switch it off (the check mark disappears). When you move the
frame afterwards, the content will stay where it is right now.
And the best of all: This doesn't work with image frames only but with all frame content (except text). As we mentioned earlier, iCalamus doesn't really differentiate between image frames, text frames, etc.
Now you know already how to adjust images to the proper size in a
frame and how to choose a useful section. In the Geometry inspector
you will find much more possibilities for twisting and bending
the frame or content. Just try and rotate the image content to the
left, then rotate the frame itself to the right, followed by shearing
both at 20 degrees and then mirror it horizontally. (Don't you ask me
what for ...)
In the Paleta Zawartość, you can change the image content presentation. Here you can reduce the opacity from 100% down to 0% stepless. Here you can also blend the image frame with other frame contents which possibly lay below the image frame. It's worth playing around with the blend modes offered by iCalamus. Just try it.
In the Paleta Zawartość's Action menu you can find the function
Stwórz kontur na bazie kontrastu
. Use it for adding a mask to
your image which can be used as a clipping path almost at a single
click. This function depends on the image type.
The other inspectors offer many more possibilities to change the image frame. The Frame inspector can add another shape, another outline or a shaddow to the frame. If you choose a distinct shape as outline, you can use it as clipping path directly in order to let the photograph of your beloved grandma shine in a pretty oval or highlight the new super product of your company with a 50 rays star. If you have assigned a shadow or outline to the image frame in the Frame inspector, you can define in the Paleta Kolor which colors should be used.
![]()
In iCalamus, you can easily create empty frame containers for several purposes.
Puslishers use to place substitutes for layout areas which have not been created or designed. Use the container frames which only show the frame shape as a guide (if you have switched frame guides visible). Furthermore, a diagonal cross indicates that these are empty frames. (We also use a diagonal cross e.g. to indicate transparent mode in color lists.)
If you want to shape or mask an image with a shape, iCalamus offers several ways to do so. The easiest and fastest way is creating one of the available container shape frames, place the image there and you're done with the masked image.
You can convert containers to normal frames afterwards by assigning a new content to them.
Here is a list of the available container shapes, which is identical with the available normal shapes.
![]()
[Ten rozdział nie został jeszcze przetłumaczony.]
Choose the desired container type in the Container tool
by
right clicking on the Container tool
symbol in the Toolbox
panel. Alternatively, keep the mouse button pressed until the
container tools menu appears, from which you can choose the container
type. Now create a new frame in the document by dragging the mouse. If
you press [Escape] before you release the mouse button, the currently
shown container will be deleted immediately.
The 'simple' container shapes are listed in the first group. The 'dynamic' container shapes are listed in the last group, sorted by complexity. You can change parameters for the dynamic containers in the Paleta Zawartośćr.

Use this tool to create shape frames. iCalamus offers a variety of pre-defined shapes, from simple rectangles to stars and corners.
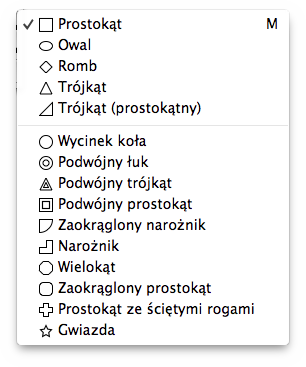
Choose the desired shape type in the Shape tool by clicking on the Shape tool symbol in the Toolbox panel. Keep the mouse button pressed until the Shape tools menu appears where you can choose the shape type. Now create a new frame in the document by dragging the mouse. If you press [Escape] before you release the mouse button, the currently shown shape will be deleted immediately.
As we assume that you will use the Shape tool often, we placed it in the right column of the Toolbox panel in order to reduce mouse distances.
The 'simple' shapes can be found in the first group of the list. The 'dynamic' shapes follow in the last group, sorted by complexity. You can change parameters for the dynamic shapes in the Paleta Zawartość.

Use this tool to create a line frame. iCalamus offers three line tools and a variety of pre-defined line types, like simple lines, multiple lines, arc lines and crosses.
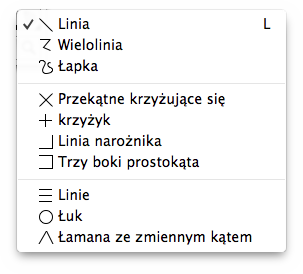
Choose the desired line type in the Line tool by clicking on the Line tool symbol in the Toolbox panel. Keep the mouse button pressed until the Line tools menu appears where you can choose the line type. Now create a new frame in the document by dragging the mouse. If you press [Escape] before you release the mouse button, the currently shown line will be deleted immediately.
Use this tool if you want to draw simple lines very fast. When you release the mouse button, a line frame is created which can be edited like all other frames. If you press [Escape] before you release the mouse button, the currently shown line will be deleted immediately.
Using this tool, you can draw multiple straight lines at once. Click to positions which should be connected by lines. If you press the mouse button while dragging to the next point, the result will not be made of straight lines but of curves. A double click ends the current polyline.
Draw absolutely free lines with the Freehand Shape tool. Just draw with the mouse cursor as you like it. As soon as you release the mouse button, your drawn path will be vectorized and rounded.
The line types in the next group are pre-defines lines which can be drawn by choosing the relevant line type and creating a frame: Ukośny krzyż, Krzyż, Linia narożnika, Trzy boki prostokąta.
The last group of line types in the list offers dynamic line types. After you have created the relevant line frame, you can change parameters for the relevant line type in the Paleta Zawartość, e.g. the number of Multiple lines (How about Music Score lines?) or the angle of an Arc line.


Use this tool for editing existing vector objects and vector paths, for adding and removing vector points, changing vector types and creating new vector paths.
Use this tool for creating new vector paths. Click somewhere in the document and start the new path there. Then click to the next position. A vector line will be created between the start point and the next point. If you drag the mouse to the position of the next point click, a bezier curve will be created from the last point to the current point instead. If you keep the mouse button pressed, you can directly resize and reformat the curve. Continue until you have placed all points. You can pause the path creation and continue at any time. The next point will always be connected to the last point.
If you want to move single points or base points of bezier curve tangents, you have to activate the Selection tool.
If you click into an already existing vector path with this tool, a new base point will be inserted at the clicked position.
If you want to remove a base point from a vector path, choose this tool and simply click on the relevant point which will be removed immediately.
If you click on a curve with this tool, it will be converted
into a vector line. If you click on a line, it will be converted into
a curve which is formed like the previous line by default. You may
then drag the base points from the straight curve
with the
mouse in order to format the curve to your needs.
